Air Fryer Hasselback Potatoes (Crispy Fans, Garlic Butter, Ready in 35 Minutes)
Hasselback potatoes are the most visually impressive potato dish you can make with almost no skill. The technique is simple — thin parallel cuts that fan apart during cooking — and the air fryer accelerates the process dramatically. What takes 55–65 minutes in an oven takes 33–37 minutes in the air fryer, and the concentrated circulating heat creates crispier fan edges than oven roasting.
PrintAir Fryer Hasselback Potatoes
Whole potatoes with thin parallel cuts that fan open during cooking, finished with garlic herb butter and crispy golden edges. Ready in under 40 minutes of cook time in the air fryer.
- Prep Time: 15 minutes
- Cook Time: 35 minutes
- Total Time: 50 minutes
- Yield: 4 servings 1x
- Category: Side Dish
- Method: Air Fryer
- Cuisine: American
Ingredients
- 4 medium Russet or Yukon Gold potatoes (uniform size)
- 4 tbsp unsalted butter, melted
- 3 garlic cloves, microplaned or very finely minced
- 1 tbsp olive oil
- Fresh rosemary, thyme, or chives, finely chopped
- ½ tsp salt, plus flaky sea salt for finishing
- Black pepper to taste
- Optional loaded toppings:
- Shredded cheddar or Gruyère
- Sour cream
- Crispy bacon bits
- Thinly sliced jalapeño
- Fresh chives
Instructions
- Wash and dry the potatoes. Do not peel. Place each potato lengthwise on a cutting board with chopsticks on either side as guides. Make thin parallel cuts (3–4mm apart) along the length of each potato, stopping when the knife hits the chopsticks so the base stays intact.
- Soak cut potatoes in cold salted water for 10 minutes to relax the cuts and remove surface starch. Drain and pat very dry.
- Combine melted butter, garlic, herbs, ½ tsp salt, and pepper in a small bowl to make the baste. Use a pastry brush to work the mixture generously into all cuts and over the entire surface of each potato. Season the outside with additional flaky salt.
- Preheat air fryer to 375°F (190°C) for 3 minutes.
- Place potatoes cut-side up in the basket, not touching each other. Cook at 375°F for 25 minutes until fans have visibly opened and edges are starting to brown.
- Remove basket and brush a second coat of butter baste into the now-open fans. If using cheese, press thin slices or shredded cheese into the gaps between the fans.
- Return to air fryer at 375°F for 10 more minutes until fans are deeply golden and the potato is fully fork-tender through the thickest part.
- Finish immediately with fresh herbs and a pinch of flaky salt. Serve hot with any loaded toppings.
Notes
Use the chopstick trick: lay two wooden chopsticks parallel to the potato on the cutting board so your knife stops before cutting all the way through.
Pat potatoes very dry after soaking — water in the cuts prevents the butter baste from adhering properly.
Cook in batches of 2 if your air fryer is small; potatoes must not touch for proper air circulation.
The second butter baste (after 25 minutes) is the most important step — the open fans allow the butter to penetrate much deeper than the first coat.
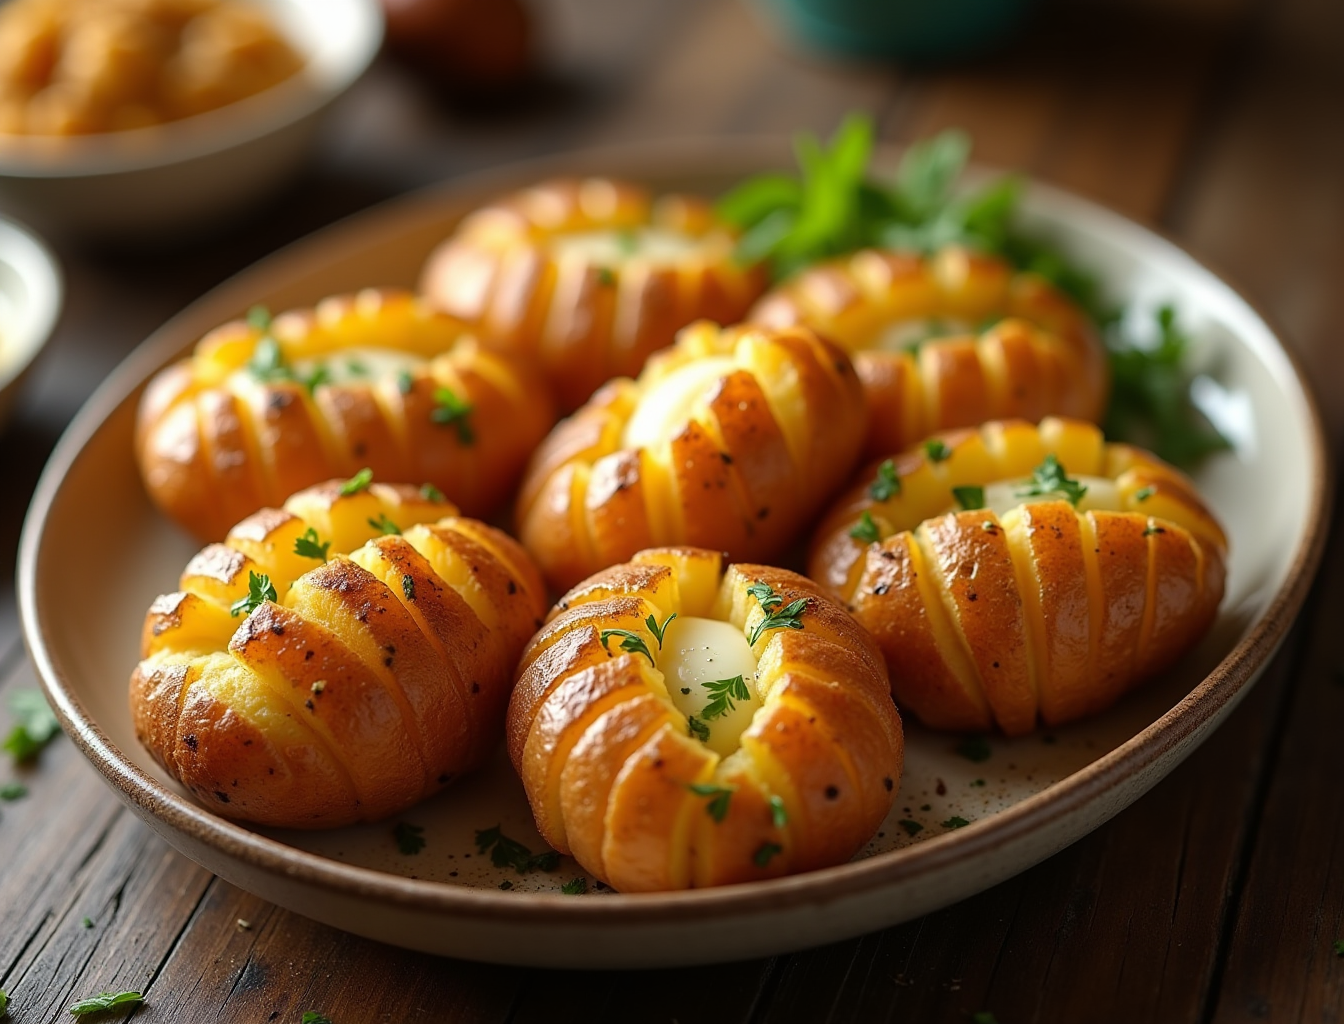
The result looks like restaurant food. Golden, fanned slices with crispy edges, a fluffy interior, and garlic herb butter worked deep into every crevice. Load them with cheese, bacon, and sour cream or keep them simple with just herbs and flaky salt — either way, they’re the kind of side dish that steals the show.
Love potato dishes? Also see our guides to air fryer roast potatoes, air fryer baked potato, and air fryer potato wedges. Full cooking times for all potato cuts are in our air fryer cooking times chart.
What Are Hasselback Potatoes?
Hasselback potatoes originate from the Hasselbacken restaurant in Stockholm, Sweden, where they were first served in the 1950s. The technique involves making a series of thin, closely-spaced parallel cuts almost all the way through a whole potato, then roasting it so the cuts fan open, creating dozens of thin, crispy-edged layers over a fluffy, intact base.
The genius of the dish is structural: each thin fan of potato is simultaneously its own crispy edge and part of the fluffy whole. Butter and seasonings work down into every cut, flavouring the potato from the inside out. Toppings like cheese, bacon, and herbs are tucked into the gaps. It’s a baked potato, an accordion, and a visual centrepiece all in one.
Why the Air Fryer Is Ideal for Hasselback Potatoes
The air fryer solves two problems that slow down oven hasselback potatoes:
- Speed: Oven hasselback potatoes typically take 50–65 minutes at 400°F. In the air fryer, the same-sized potatoes are done in 33–37 minutes — a 30–40% time reduction.
- Edge crispiness: The fans of a hasselback potato are thin enough that they need hot, dry, circulating air to crisp up properly. An oven roasts with ambient heat; the fans crisp from one direction at a time. An air fryer pushes hot air around every surface simultaneously, creating crispier, more even browning on each fan edge.
The result: hasselback potatoes with more dramatic fan separation and crispier edges than the oven version, in significantly less time.
Ingredients You’ll Need
- 4 medium Russet or Yukon Gold potatoes (uniform size — important for even cooking)
- 4 tbsp unsalted butter, melted
- 3 garlic cloves, microplaned or very finely minced
- 1 tbsp olive oil
- Fresh rosemary, thyme, or chives, finely chopped
- Flaky sea salt and black pepper
- Optional loaded toppings: shredded cheddar or Gruyère, sour cream, crispy bacon bits, thinly sliced jalapeño, chives
Butter baste mixture: Combine melted butter, garlic, herbs, ½ tsp salt, and pepper in a small bowl. This is both the base seasoning and the key to flavour penetrating the cuts.
How to Cut Hasselback Potatoes Without Cutting Through
This is the step that intimidates people, and it shouldn’t. The technique is straightforward once you understand the guide system.
The Chopstick Trick
Place the potato lengthwise on a cutting board. Lay two wooden chopsticks or wooden spoon handles flat on the board, one on each side of the potato, running parallel to the length of the potato. The chopsticks act as a stop — your knife blade will hit the chopstick before it reaches the board, preventing you from cutting all the way through.
Make thin, parallel cuts (approximately 3–4mm apart) from one end of the potato to the other. Work slowly and keep cuts perpendicular to the potato’s length. Every cut should be the same depth (hitting the chopstick) and the same distance apart.
The potato should remain in one piece at the base. Test by gently trying to fan the slices open — they should separate at the top but remain connected at the bottom.
Alternative method: Place the potato in a wooden spoon (one of those deep oval spoons). The curved spoon prevents the knife from going too deep. This works but gives you slightly less control than chopsticks for consistent cut spacing.
Common mistakes:
- Cutting too fast and cutting through — work slowly, especially on the first potato
- Spacing cuts too far apart (more than 5mm) — fewer, wider fans means less surface area for crisping and less dramatic visual effect
- Using a dull knife — a sharp knife is essential; a dull blade drags and can split the potato rather than cutting cleanly
How to Make Air Fryer Hasselback Potatoes
Prep time: 15 minutes | Cook time: 33–37 minutes | Serves: 4
Prep and Cut
Wash and dry the potatoes. Do not peel — the skin is structural and crisps into the best part of the potato. Using the chopstick method described above, make thin parallel cuts (3–4mm apart) along the length of each potato.
Place cut potatoes in a bowl of cold salted water for 10 minutes. This relaxes the cuts and opens the fans slightly, and removes some surface starch. Drain and pat very dry — water in the cuts will prevent the butter from adhering properly.
First Butter Baste
Using a pastry brush, work the butter baste mixture generously into all the cuts and over the entire surface of each potato. Be thorough — the goal is to get butter deep into every cut so the interior of every fan is seasoned. Season the outside with additional flaky salt.
Preheat air fryer to 375°F (190°C) for 3 minutes.
Air Fry — Time and Temperature
Place potatoes in the air fryer basket, cut-side up. Arrange them so no potato is touching another — good air circulation around all surfaces is important. If your air fryer is small, cook in batches of 2.
Cook at 375°F (190°C) for 25 minutes. At this point, the fans should have visibly opened and the edges will be starting to brown. The centre of the potato should give slightly when pressed — not fully soft yet.
Second Baste and Finish
Remove basket. Use a brush or small spoon to work a second coat of the butter baste into the now-open fans. This second baste is where the flavour really develops — the fans are open and the butter penetrates much deeper than it could before cooking.
If using cheese: press thin slices or shredded cheese into the gaps between the fans now.
Return to air fryer at 375°F for 8–10 more minutes until the fans are deeply golden and the potato is fully fork-tender through the thickest part. Test by pressing a fork into the base — it should slide in with no resistance.
Finish immediately with fresh herbs and an extra pinch of flaky salt. Serve hot.
Loaded Hasselback Potato Variations
Classic Loaded Hasselback
The crowd favourite. In the final 8 minutes, press thin cheddar slices (or a generous pinch of shredded cheddar or Gruyère) into the gaps between each fan. After cooking, top with a dollop of sour cream, a scatter of crispy bacon bits, and sliced fresh chives. This is a baked potato and a side dish in one — filling enough to be a light main.
Mini Hasselback with Fingerlings
Use fingerling potatoes instead of full-sized ones. Make shallower cuts (easier since fingerlings are small). Reduce cook time to 20–22 minutes at 375°F. These are ideal as a party appetizer — serve with sour cream dipping sauce and garnish with herbs. You can fit many more in the air fryer basket at once.
Caprese Hasselback
After cooking, press alternating thin slices of fresh mozzarella and halved cherry tomatoes into the fans while the potato is still hot. Drizzle with pesto and balsamic glaze. This is a more impressive dinner party presentation that takes less than 2 minutes to assemble after the potato comes out of the air fryer.
Pro Tips for Perfect Hasselback Potatoes
- The chopstick cutting guide is essential. Place the potato between two chopsticks before slicing. This is the technique that makes or breaks the recipe — it prevents you from cutting through and guarantees even-depth cuts every time.
- Soak after cutting to relax and open the fans. A brief cold water soak after cutting helps the cuts open up, removes surface starch, and makes the second baste more effective. Pat very dry before oiling.
- Baste twice for maximum flavour and crispiness. The first baste seasons before cooking; the second baste midway opens the fans further, adds another flavour layer, and creates the deeply caramelised edges that define this dish.
- Use microplaned garlic in the butter. Finely grated garlic disperses evenly through the butter baste and penetrates deep into the cuts without burning (which chunky or minced garlic can do at high heat).
- Choose potatoes of equal size. Uniform-sized potatoes cook in the same time. A mix of large and small potatoes means some are undercooked or overcooked when the others are perfect.
Storage and Reheating
Storage: Store whole in an airtight container in the refrigerator for up to 3 days. The fan structure is delicate — store them intact rather than slicing, which helps them hold their shape.
Reheating: Air fryer at 375°F (190°C) for 6–8 minutes. The fans re-crisp very well. Add a small knob of butter into the cuts before reheating for additional moisture and flavour. Avoid the microwave — it softens the fans completely.
Note on loaded versions: Hasselback potatoes topped with sour cream, fresh herbs, or bacon are best eaten fresh. Sour cream does not reheat well; add fresh toppings after reheating rather than storing with them already applied.
Frequently Asked Questions
How do you cut hasselback potatoes without cutting through?
Place the potato lengthwise between two chopsticks or wooden spoon handles on a cutting board. Make thin slices (3–4mm apart) along the potato — the chopsticks act as a stop guide, physically preventing the knife from cutting all the way through. This is the one technique that makes the recipe accessible to anyone.
How long do hasselback potatoes take in the air fryer?
Medium Russet or Yukon Gold hasselback potatoes take 33–37 minutes total at 375°F (190°C): approximately 25 minutes for the first cook phase (fans open and begin browning), then 8–10 minutes more after the second butter baste or cheese addition. Adjust for potato size — larger potatoes may need 5 extra minutes on the first cook.
What kind of potato is best for hasselback potatoes?
Russet potatoes are the classic choice: high starch, fluffy interior, and they fan open dramatically. Yukon Gold produces a slightly creamier, more buttery interior with thinner skin that also crisps beautifully. Avoid waxy red or new potatoes — they don’t fan open as dramatically and have a dense, firm texture that doesn’t benefit from this cooking method.
Do you need to parboil hasselback potatoes before air frying?
No — hasselback potatoes do not need to be parboiled. The thin fans cook through quickly because of their reduced thickness. The cold water soak (10 minutes after cutting) is sufficient preparation and serves a different purpose — opening the fans and removing surface starch for better butter adhesion.
Can you prep hasselback potatoes ahead of time?
Yes. Cut the potatoes and apply the first butter baste up to 6 hours ahead; store covered in the refrigerator. Air fry directly from the fridge, adding 3–5 minutes to the first cooking phase to account for the cold start. The second baste and finish proceed normally. This makes them easy for dinner parties.
Cooking times verified against multiple tested sources including Running to the Kitchen and The Almond Eater. Temperature guidance cross-referenced with The Slow Roasted Italian.